Configuring X509 Certificate Authenticator with CRL Validator in WSO2 IS

In my previous blog, I talked about what X509 Certificate authentication is and how it works. Now we are about to take another step and configure an extra validator beyond the basic validation for X509 certificates.
CRL Validation
CRL stands for Certificate Revocation List which contains a list of serial numbers of revoked certificates. This list is issued by a CA — Certificate Authority (or a trusted third party) to explicitly mention the revoked certificates before their expiry time. This can happen due to various reasons as follows.
- Private key of the certificate or the CA is compromised.
- Replacement certificate has been issued.
- Changes in the usage of the certificate.
- Certificate owner is no longer deemed trusted.
The issued certificate itself contains a URI to locate the CRL which can be used to verify its revocation status. WSO2 IS (Identity Server) uses this URI to download the CRL and check whether the given client certificate is in the CRL. If so, IS fails authentication since the given client certificate is already revoked.
Furthermore, IS caches this downloaded CRL and uses the cached value in the next time. Each CRL has an expiry time as well. When CRL expires, CA issues a new CRL with the latest list of revoked certificates. Therefore, if the CRL in the cache is expired, IS downloads the CRL again.
Pre Setup
Only for Mac Users
Throughout this blog, we will be using OpenSSL commands for certificate creation process. Since the default OpenSSL used in mac is LibreSSL (which lacks some default configs that already available in original openssl configs), mac users can download OpenSSL using brew.
brew install openssl@3Now export the downloaded brew OpenSSL bin path to the PATH variable.
export PATH="/opt/homebrew/Cellar/openssl@3/3.2.1/bin:$PATH"When accessing openssl.cnf file, access the file in the following directory.
/opt/homebrew/etc/openssl@3/openssl.cnfSetup
1. Download the Latest WSO2 Identity Server
Let’s start our setup by first downlading the latest WSO2 IS through here. After downloading, you can extract the zip. From here onwards, $CARBON_HOME is defined as the symbolic root for the extracted IS.
2. Configure X509 Certificate Authenticator
As the first step in configuring X509 authenticator with CRL validator, let’s enable CRL based certificate revocation validation in OpenSSL configurations.
Open the /usr/lib/ssl/openssl.cnf file and add the following property under x509_extensions. (CRL distribution point setup will be discussed in section TODO and the hosted URL should be included as the URI.)
Note: If your are mac user and have downloaded OpenSSL using brew, the file can be found at /opt/homebrew/etc/openssl@3/openssl.cnf. Furthermore, the following property should be added under usr_cert.
crlDistributionPoints = URI:http://localhost:8000/rootCA.crlNow, let’s create a private key for our local CA.
openssl genrsa -out rootCA.key 2048Using the above key, now we can create a certificate for our CA that will last for another 10 years.
openssl req -new -x509 -days 3650 -key rootCA.key -out rootCA.crtThis will prompt a set of questions where you can answer them with your CA’s details.
Country Name (2 letter code) [AU]: SL
State or Province Name (full name) [Some-State]: Western
Locality Name (eg, city) [ ]: Colombo
Organization Name (eg, company) [Internet Widgits Pty Ltd]: WSO2
Organizational Unit Name (eg, section) [ ]: QA
Common Name (e.g. serverFQDN or YOUR name) [ ]: johndoe
Email Address [ ]: johndoe@gmail.com
OpenSSL certificate requires some set of files and some supporting directories and you can create them using following commands.
mkdir -p demoCA/newcerts
touch demoCA/index.txt
echo '01' > demoCA/serial
Now let’s create the client certificate.
keytool -genkey -v -alias localcrt -keyalg RSA -validity 3650 -keystore localcrt.jks -storepass localpwd -keypass localpwdThis will prompt another set of questions where you can answer them with your client’s details.
What is your first and last name? janedoe
What is the name of your organizational unit? IAM
What is the name of your organization? WSO2
What is the name of your City or Locality? Colombo
What is the name of your State or Province? Western
What is the two-letter country code for this unit? SL
For the next step, let’s generate the Certificate Signing Request (CSR) using the generated keystore file.
keytool -certreq -alias localcrt -file localcrt.csr -keystore localcrt.jks -storepass localpwdNow you can sign the CSR using the CA’s private key.
openssl ca -batch -startdate 20240201010000Z -enddate 20250201010000Z -keyfile rootCA.key -cert rootCA.crt -policy policy_anything -config /path/to/openssl.cnf -out localcrt.crt -infiles localcrt.csrAfter this is done, let’s import CA and signed certificate into the keystore.
keytool -importcert -alias rootCA -file rootCA.crt -keystore localcrt.jks -storepass localpwd -noprompt
keytool -importcert -alias localcrt -file demoCA/newcerts/01.pem -keystore localcrt.jks -storepass localpwd -noprompt
Now combine your certificate and the private key into a PKCS#12 (P12) bundle.
keytool -importkeystore -srckeystore localcrt.jks -destkeystore localhost.p12 -srcstoretype JKS -deststoretype PKCS12 -srcstorepass localpwd -deststorepass browserpwd -srcalias localcrt -destalias browserKey -srckeypass localpwd -destkeypass browserpwd -nopromptFinally, export the created CA and client certificates into the IS trust stores.
keytool -import -keystore $CARBON_HOME/repository/resources/security/client-truststore.jks -storepass wso2carbon -alias rootCA -file rootCA.crt -noprompt
keytool -importcert -alias localcrt -file localcrt.crt -keystore $CARBON_HOME/repository/resources/security/client-truststore.jks -storepass wso2carbon -noprompt
3. Export the Certificate into the Browser
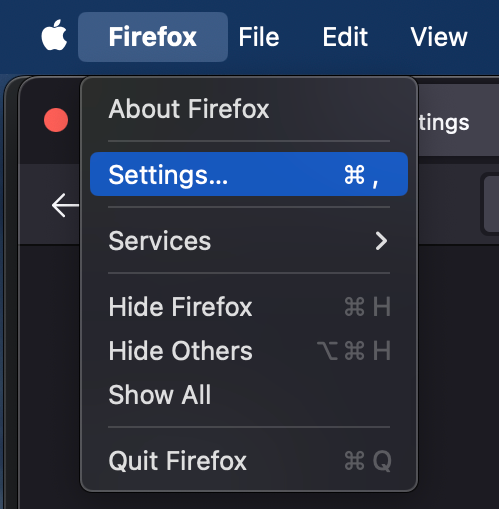
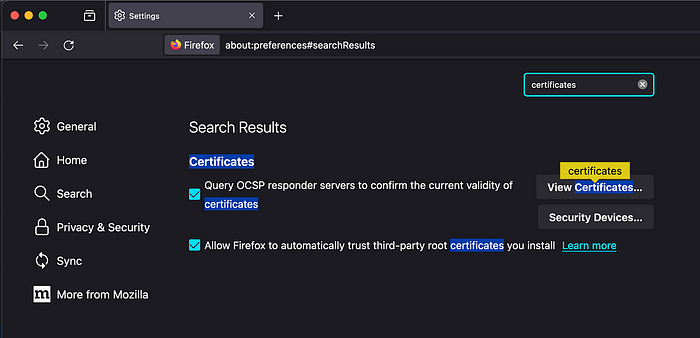
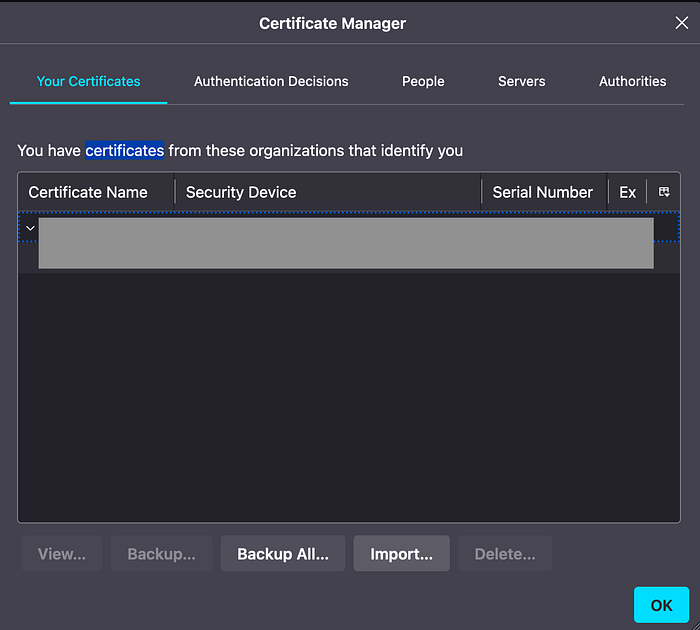
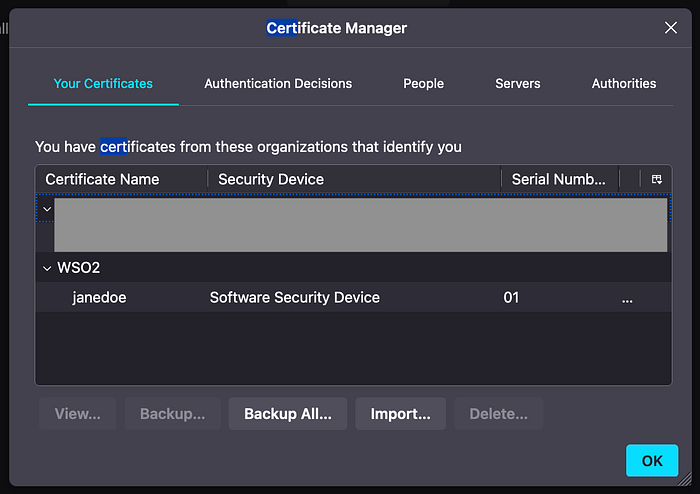
Now, you need to include your generated certificate in your browser, and when you log in to your client app, this certificate will be used for authentication. For the purpose of this article, I’ll be using the Mozilla Firefox browser. Follow the steps below, in order to include your certificate in the web browser.

4. Configure X509 Certificate Authenticator in IS
Add the following configurations into both deployment.toml files in order to register our X509 Certificate authenticator in IS.
[authentication.authenticator.x509_certificate.parameters]
name ="x509CertificateAuthenticator"
enable=true
AuthenticationEndpoint="https://localhost:9443/x509-certificate-servlet"
username= "CN"
Next, we need configure trusted certificates of CAs and intermediate CAs in IS. Hence, add the following configuration to configure trust stores to load the CA Certificates.
[certificate_validation.truststore]
file_path = "$CARBON_HOME/repository/resources/security/client-truststore.jks"
password = "wso2carbon"
type = "JKS"
5. Disable OCSP Certificate Validation
Since we are only using CRL validation, let’s disable OCSP validation according to the steps mentioned in here.
6. Add a New User to IS
Add a new user with the Common Name (CN) used to create the x509 certificate as the username (ex: janedoe) by following the instructions in here.
7. Setup Sample App
In this article, we will be deploying the “Travelocity” sample app [4]. First, you can download the app using this link and then, add the downloaded war file into the webapps folder of your tomcat server directory.
Next, open the file, $TOMCAT_HOME/webapps/travelocity.com/WEB-INF/classes/travelocity.properties, and change the following value with the configured domain name of your IS.
SAML2.IdPURL=https://localhost:9443/samlssoNow, let’s start our tomcat server. After that, follow the steps in Register a SAML web app, in order to register our sample app in our IS cluster.
After the basic setup is done, add X509 Certificate authentication as the Authentication mechanism for the sample app.
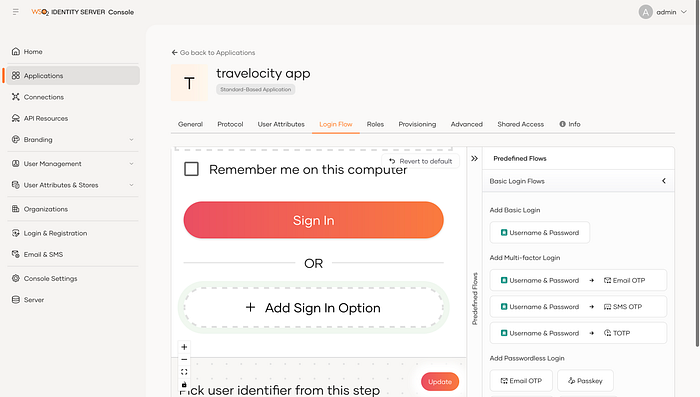
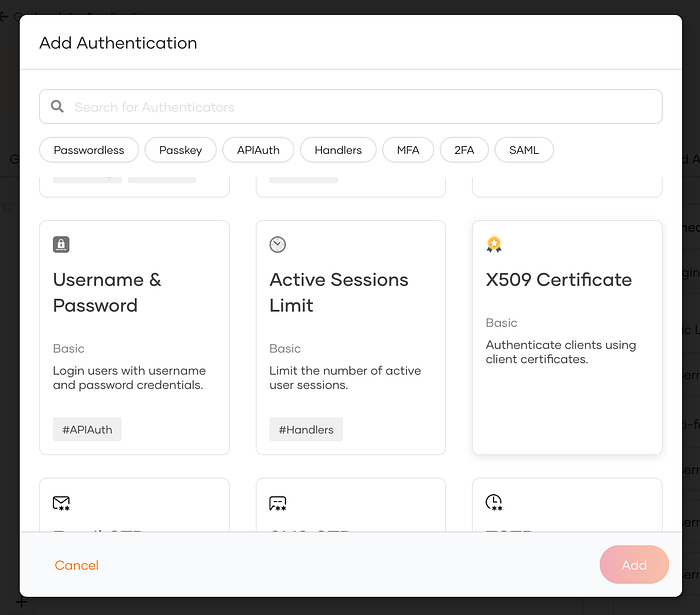
Log into IS Console as an admin, and navigate to Applications > {your app} > Login Flow. In there, select “X509 Certificate” as one of the sign on options.
Try out the Login Flow
Now it is time to try out our app with X509 Certificate authentication. First, go to your app login page and click on “Login”. Then the browser will prompt for the client certificate as follows.

At last, you should be able to log in successfully with your valid x509 certificate.
Kudos on getting your app up and running with the X509 authenticator in WSO2 IS using CRL Validation!